Open EZVIZ Platform SDK User Manual (Android)
Overview
This document introduces the APIs' definition and calling sequence of Open EZVIZ Platform SDK (Android).
Glossary
| Term | Description |
|---|---|
| accessToken | Access token, used for client software authentication, which is returned by server |
| AppKey | Applying for AppKey from EZVIZ open platform |
| deviceSerial | Device serial No. |
| CameraNo | Device channel No. |
| deviceSerial+CameraNo | Camera ID |
| OSD | Video's current time |
| PTZ | PTZ control. You can control the device to pan, tilt, or zoom via other terminals. |
Functions
| Function | Description |
|---|---|
| Account operations (authorize to login, log in via SDK API) | Authorize to Open EZVIZ Platform and reuse the capability |
| Camera List | Get devices in the account |
| Live View | View the live video. You can set the resolution. |
| Playback (video stored in SD card or Cloud Storage) | View the recorded video files. |
| Two-Way Audio | Two-way audio, including half-duplex and full-duplex. |
| Device Settings | API for device settings. |
| Device Control API (PTZ, Image) | PTZ Control |
| Wi-Fi Configuration | Wi-Fi settings of the device. |
| Record during Live View and Playback | Record the video files when playing the live video and recorded videos. |
| Capture during Live View and Playback | Capture the images when playing the live videos and recorded videos. |
| Alarm Information | Get alarm information. |
Project Configuration
Environment
Supports Android Studio 1.4 and above
Supports JDK 7.0 and above
Supports Android system version 4.0 and above
1. Apply for appKey
Firstly, you should apply to us about developer appkey.
2. Install SDK
SDK Installation Steps
Get SDK via Gradle
If you have installed by directly downloading in the previous, you should delete the previously copied.so library file and .jar packet.
dependencies {
    compile 'com.hikvision.ezviz:ezviz-sdk:4.8.6.2'
 }
Get SDK via Repository in Maven
If you have installed by directly downloading in the previous, you should delete the previously copied.so library file and .jar packet.
<dependency>
    <groupId>com.hikvision.ezviz</groupId>
    <artifactId>ezviz-sdk</artifactId>
    <version>4.8.6.2</version>
</dependency>
Directly Download
1.Copy the .so file in the directory of /libs/armeabi-v7a to the corresponding directory of your own project.
2.Copy the .jar package in the directory of /libs to the corresponding directory of your own project (including .jmdns and .gson).
3. Configure Project
Configure Android Permission
Add in the file AndroidMainfest.xml:
//Network Permission
<uses-permission android:name="android.permission.INTERNET"/>
<uses-permission android:name="android.permission.ACCESS_NETWORK_STATE"/>
<uses-permission android:name="android.permission.RECORD_AUDIO"/>
<uses-permission android:name="android.permission.READ_PHONE_STATE"/>

//Storage Permission
<uses-permission android:name="android.permission.WRITE_EXTERNAL_STORAGE"/>

//Wi-Fi Status Permission
<uses-permission android:name="android.permission.ACCESS_WIFI_STATE"/>
<uses-permission android:name="android.permission.CHANGE_WIFI_STATE"/>
<uses-permission android:name="android.permission.CHANGE_WIFI_MULTICAST_STATE"/>
Configure build.gradle
    defaultConfig {
       ...
        ndk {
            abiFilters "armeabi-v7a"// Only supports v7a
        }
    }
     sourceSets {
        main {
            jniLibs.srcDirs = ['libs']
        }
    }
Note: Currently only supports v7a. It can only be used in armeabi-v7a.
    ndk {
      abiFilters "armeabi-v7a"// Only supports 32-bit.
    }
For permission android.permission.READ_PHONE_STATE, you are not required to add it if not necessary.
Configure AndroidManifest.xml
Add the activity definition as follows, including login, enabling cloud storage, etc.
    <activity
        android:name="com.videogo.main.EzvizWebViewActivity"
        android:screenOrientation="portrait"
        android:configChanges="orientation|keyboardHidden">
    </activity>
Add the following broadcast receiver, which is used for receiving the network changes to refresh the SDK network status, for receiving the login succeeded message to enable other pages. Replace ##you_BroadcastReceiver as the broadcast receiver you defined in the code.
   <receiver
       android:name="you_BroadcastReceiver"
       android:exported="false" >
       <intent-filter>
            <action android:name="com.videogo.action.OAUTH_SUCCESS_ACTION" />
        </intent-filter>
   </receiver>
4. Initialize Code
It is recommended to initialize the code in the application.
/** * Enable/Disable SDK logs. */
EZGlobalSDK.showSDKLog(true);
/** * Supports P2P streaming or not. See the API for details. */
EZGlobalSDK.enableP2P(false);
/** * Replace the APP_KEY as the one you applied.  */
EZGlobalSDK.initLib(this, APP_KEY);
5. Code Obfuscation
Add the following content when packaging.
-dontwarn com.ezviz.**
-keep class com.ezviz.** { *;}


-dontwarn com.hik.**
-keep class com.hik.** { *;}

-dontwarn com.hikvision.**
-keep class com.hikvision.** { *;}

-dontwarn com.videogo.**
-keep class com.videogo.** { *;}

-dontwarn org.MediaPlayer.PlayM4.**
-keep class org.MediaPlayer.PlayM4.** { *;}

-dontwarn com.sun.jna.**
-keep class com.sun.jna.**{*;}

# Gson Obfuscation
-keepattributes Annotation
-keep class sun.misc.Unsafe { *; }
-keep class com.idea.fifaalarmclock.entity.*
-keep class com.google.gson.stream.* { *; }

#xlog Obfuscation of mars
-keep class com.tencent.mars.** {
 public protected private *;
}
SDK Initialization
1. Initialize Authorization Process
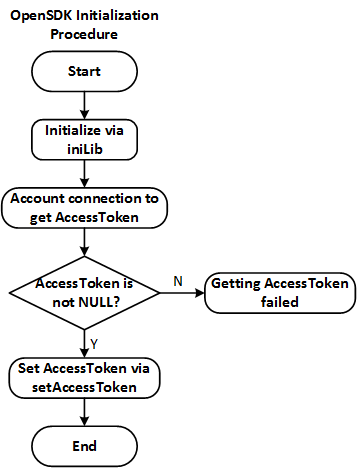
For Authorized User:
Oversea:
- The third-party server gets accessToken and expiry time via server API. accessToken is used for authorization, expiry time is used for scheduled refresh.
- The third-party server sends the accessToken to the third-party application (integrated with SDK). The third-party application calls setAccessToken (String accesstoken) to finish authorization.
EZGlobalSDK.getInstance().setAccessToken(String accessToken); - Call after logout
Logout
OrEZGlobalSDK.getInstance().logout();EZGlobalSDK.getInstance().setAccessToken(null);
For the users who wants to call the SDK login page for authorization:
Get area list by calling EZGlobalSDK.getInstance().getAreaList(). Select the current area's areaId and enter the login H5 page by calling EZGlobalSDK.getInstance().openLoginPage(String areaId). You can log in to the account in this page.
EZGlobalSDK.getInstance().getAreaList();

EZGlobalSDK.getInstance().openLoginPage(String areaId)
After login, it will send broadcast. If the action is Constant.OAUTH_SUCCESS_ACTION, it indicates login succeeded. After login, you can perform further operation in the App and call the EZGlobalSDK API, and the EZGlobalSDK will automatically complete the configuration of accessToken authorization.
The EZGlobalSDK can cache the accessToken. When you open the App next time, the authorization will be completed during initialization.
If you the accessToken is authenticated via H5 page, EZGlobalSDK can refresh the accessToken automatically, and it will not be expired or invalid.
To get the accessToken cached by EZGlobalSDK, call EZGlobalSDK.getInstance().getEZAccessToken() and you will get EZAccessToken, which includes accessToken and its expiry time. You should consider accessToken's expiry time if you call the EZVIZ API by accessToken.
EZGlobalSDK.getInstance().getEZAccessToke();
2. Live View
1. Steps:
- Create player
- Set handle callback and display area. If the device is configured with stream encryption, you should set the encryption key (by default, key is the device's 6-bit verification code)
- Start live view
- Stop live view
- Release the player
Example Code:
    EZPlayer player  = EZGlobalSDK.getInstance().createPlayer(String deviceSerial,int cameraNo);

    //Set a handle for transmitting message from player to handle.
    player.setHandler(mHandler);

    //Set the display parameter of the player
    player.setSurfaceHold(mHolder);

    /**
    * For the device whose stream is encrypted, the encryption key is required.
    * The stream encryption key is used for decrypting the encrypted video. This API can be called when receiving error callback of ERROR_INNER_VERIFYCODE_NEED or ERROR_INNER_VERIFYCODE_ERROR.
    * @param verifyCode Stream encryption key (by default, key is the device's 6-bit verification code).
    */
    player.setPlayVerifyCode(String verifyCode);

    //Start live view
    player.startRealPlay();

    //Stop live view
    player.stopRealPlay();

    //Release resource
    player.release();
2. Notes:
- During live view, you can perform the following operations: recording, capture, image flipping, two-way audio, PTZ control, audio control, and digital zoom. For details, refer to EZPlayer of API. The APIs which control the PTZ, lens, and two-way audio are restricted APIs. You should call them based on the device capability. For the device capability, refer to the attribute value of EZDeviceInfo.
  //Start Recording. recordFile:The local saving path of the recorded video files. For example: Environment.getExternalStorageDirectory().getPath()+"/abc"
  player.startLocalRecordWithFile(String recordFile)

   // Stop Recording. It is used with startLocalRecordWithFile.
  player.stopLocalRecord()

  //Capture
  player.capturePicture()

  //Image Flipping
  EZGlobalSDK.getInstance().controlVideoFlip(deviceSerial,cameraNo, EZConstants.EZPTZDisplayCommand.EZPTZDisplayCommandFlip)

  //Audio Control
  player.openSound();
  player.closeSound();


  /**
   * API for PTZ Control
   * The API is long-running. Call it in the thread.
   * @param deviceSerial   Device Serial No.
   * @param cameraNo       Channel No.
   * @param command        PTZ Control Command
   * @param action         Start/Stop
   * @param speed          Speed level (0 to 2)
   * @return return Operation succeeded or failed (returning with error code)
   */
    EZGlobalSDK.getInstance().controlPTZ(String deviceSerial,int cameraNo, EZPTZCommand command, EZPTZAction action, int speed)
Set the video's definition (videoLevel) by setVideoLevel of EZGlobalSDK. Adjust it before or during live view. During live view, if you set the video definition, stop live view (stopRealPlay) first and then start live view again (startRealPlay) so that the settings will take effect.
   EZGlobalSDK.getInstance().setVideoLevel(String deviceSerial,int cameraNo, int videoLevel);

   //Configured
   // Stop live view
   stopRealPlay();
   // Start Live View
   startRealPlay();
After starting live view, you will receive the following messages in the callback message.
a. Succeeded Message: 102 (EZRealPlayConstants.MSG_REALPLAY_PLAY_SUCCESS).
b. Succeeded Message: 134 (EZConstants.MSG_VIDEO_SIZE_CHANGED).
c. Failed Message: 103 (EZRealPlayConstants.MSG_REALPLAY_PLAY_FAIL). Check error code (errorCode) if failed. If the error code is 400035 (verification code required) or 400036 (verification code error), the developer should ask the user to enter the verification code again, and call setPlayVerifyCode to set the password, and then start live view again.
@Override
public void handleMessage(Message msg) {
    switch (msg.what) {
        case EZConstants.EZRealPlayConstants.MSG_REALPLAY_PLAY_SUCCESS:
            //Playing succeeded.
            break;
        case EZConstants.EZRealPlayConstants.MSG_REALPLAY_PLAY_FAIL:
            //Playing failed with error information.
            ErrorInfo errorinfo = (ErrorInfo) msg.obj;
            //Returned with error code for playing failed.
            int code = errorinfo.errorCode
            // Returned with error code for playing failed module.
            String codeStr = errorinfo.moduleCode
            //Returned with description for playing failed.
            String description = errorinfo.description
            //Returned with resolution for playing failed.
            String description = errorinfo.sulution
            break;
        case EZConstants.MSG_VIDEO_SIZE_CHANGED:
            // Parsed image resolution and callback
            try {
                String temp = (String) msg.obj;
                String[] strings = temp.split(":");
                int mVideoWidth = Integer.parseInt(strings[0]);
                int mVideoHeight = Integer.parseInt(strings[1]);
                //Parsed image resolution
            } catch (Exception e) {
                e.printStackTrace();
            }
            break;
        default:
            break;
    }
}
3. Playback
1. Steps
- Create player.
- Set handle callback and display area. If the device is configured with stream encryption, you should set the encryption key (by default, key is the device's 6-bit verification code).
- Start playback.
- Stop playback.
- Release player.
Example Code:
  EZPlayer player  = EZGlobalSDK.getInstance().createPlayer(String deviceSerial,int cameraNo);

  // Set a handle, which is used for transmitting message from player to handle
  player.setHandler(mHandler);

  //Set the display parameter of the player
  player.setSurfaceHold(mHolder);

  /**
 * For the device whose stream is encrypted, the encryption key is required.
 * The stream encryption key is used for decrypting the encrypted video. This API can be called after receiving error callback of ERROR_INNER_VERIFYCODE_NEED or ERROR_INNER_VERIFYCODE_ERROR.
 * @param verifyCode Stream encryption key (by default, the key is the device's 6-bit verification code).
 */
  player.setPlayVerifyCode(String verifyCode);


  /**
    * Start Playback (Stored in Cloud Storage)
    * @param cloudFile Video files stored in Cloud Storage. See Search Video Files in Cloud Storage below.
    * @return  true-success, false-failure
    */
  player.startPlayback(EZCloudRecordFile cloudFile)

  //Or
  /**
   * Start Playback (Stored in SD Card)
   * @param deviceFile Video files stored in SD card. See Search Video Files in SD Card below.
   * @return  true-success, false-failure
   */
  player.startPlayback(EZDeviceRecordFile deviceFile)

  //Or
/**
  * Start Playback (Stored in SD Card) By Time
  * @param startTime Start time
  * @param stopTime End time
  * @return  true-success, false-failure
  */
  player.startPlayback(Calendar startTime, Calendar stopTime)


  /**
    *  Stop Playback
    */
  player.stopPlayback()
2. Notes:
- Search Video Files in Cloud Storage
    /**
     * Search Video Files in Cloud Storage
     * The API contains network operation. Call it in the thread.
     * @param deviceSerial Device serial No.
     * @param cameraNo    Camera No. (EZCameraInfo.cameraNo)
     * @param startTime    Start time of search
     * @param endTime      End time of search
     * @return Video file list in cloud storage
     * @throws BaseException
     */
      EZGlobalSDK.getInstance().searchRecordFileFromCloud(String deviceSerial, int cameraNo, Calendar startTime, Calendar endTime)
- Search Video Files in SD Card
    /**
     * Search Video Files in SD Card
     * If the device is linked with an NVR, it will search the video files stored in the NVR instead of searching in the device SD card.
     * The API is long-running. Call it in the thread.
     */
    EZGlobalSDK.getInstance().searchRecordFileFromDevice(String deviceSerial, int cameraNo, Calendar startTime, Calendar endTime)
- During playback, you can perform the following operations: clipping, capture, audio control, digital zoom, and timeline control (seekPlayback). For details, refer to EZPlayer of API.
/**
* Playback Based on Offset Time
* Call this API when dragging the progress bar. Stop playback first and set the offset time as the start time to start playback.
* Replace this API with stopPlayback + startPlayback (offsetTime, stopTime)
* @param offsetTime Recording Offset Time
*/
player.seekPlayback(Calendar offsetTime)
- getOSDTime: Get the current time in the video for playback. If the start time is 8:00, end time is 9:00, getOSDTime is 8:30, then the playing progress is 50%.
- During playback, call pausePlayback to pause playback and call resumePlayback to resume playback.
/**
 * Pause Playback
 */
player.pausePlayback()

/**
 *  Resume Playback
 */
player.resumePlayback()
After starting playback, you will receive the following messages in the callback message.
a.SucceededMessage:205(EZConstants.EZPlaybackConstants.MSG_REMOTEPLAYBACK_PLAY_SUCCUSS).
b. Failed Message: 206 (EZConstants.EZPlaybackConstants.MSG_REMOTEPLAYBACK_PLAY_FAIL). Check error code (errorCode) if failed. If the error code is 400035 (verification code required) or 400036 (verification code error), the developer should ask the user to enter the verification code again, and call setPlayVerifyCode to set the password, and then start playback again.
c. Video Resolution Callback: 134 (EZConstants.MSG_VIDEO_SIZE_CHANGED)
4. Two-Way Audio
1. Steps:
- Create two-way audio player
- Set handle callback and display area. If the device is configured with stream encryption, you should set the encryption key (by default, key is the device's 6-bit verification code)..
- Start two-way audio.
- Stop two-way audio.
- Release two-way audio player.
Example Code
    EZPlayer talk  = EZOpenSDK.getInstance().createPlayer(String deviceSerial,int cameraNo);
    // Set a handle, which is used for transmitting message from player to handle.
    talk.setHandler(mHandler);
    /**
     * For the device whose stream is encrypted, the encryption key is required.
     * The stream encryption key is used for decrypting the encrypted video. This API can be called when receiving error callback of ERROR_INNER_VERIFYCODE_NEED or ERROR_INNER_VERIFYCODE_ERROR.
     * @param verifyCode Stream encryption key (by default, the key is the device's 6-bit verification code).
     */
    talk.setPlayVerifyCode(String verifyCode);

     //Start Two-Way Audio
    talk.startVoiceTalk();

    //Stop Two-Way Audio
    talk.stopVoiceTalk();

    //For half-duplex two-way audio, you should call the above API to start two-way audio.
   //After starting two-way audio, you can perform the following operations (setVoiceTalkStatus) to hear sound from the device or phone.

    //Listen on Device and Speak on Phone
    talk.setVoiceTalkStatus(true);

    // Listen on Phone and Speak on Device
    talk.setVoiceTalkStatus(false);
2. Notes:
The two-way audio operations are different according to the device capability. Get the device two-way audio capability by isSupportTalk in EZDeviceInfo. 0: Not Supported. 1: Supports Full-Duplex Two-Way Audio. 3: Supports Half-Duplex Two-Way Audio. For one device, if you want to enable different functions (live view, playback, or two-way audio), you should create a player for each function, respectively.
If the video contains sound, you should mute the video sound (closeSound) before starting two-way audio. After stopping two-way audio, turn on the video sound (openSound). For details, see the demo.
After starting two-way audio, you will receive the following messages in the callback message.
a. Succeeded Message: 113 (RealPlayMsg.MSG_REALPLAY_VOICETALK_SUCCESS).
b. Failed Message: 114 (RealPlayMsg.MSG_REALPLAY_VOICETALK_FAIL). Check error code (errorCode) if failed. If the error code is 400035 (verification code required) or 400036 (verification code error), the developer should ask the user to enter the verification code again, and call setPlayVerifyCode to set the password, and then start two-way audio again.5. Add Device
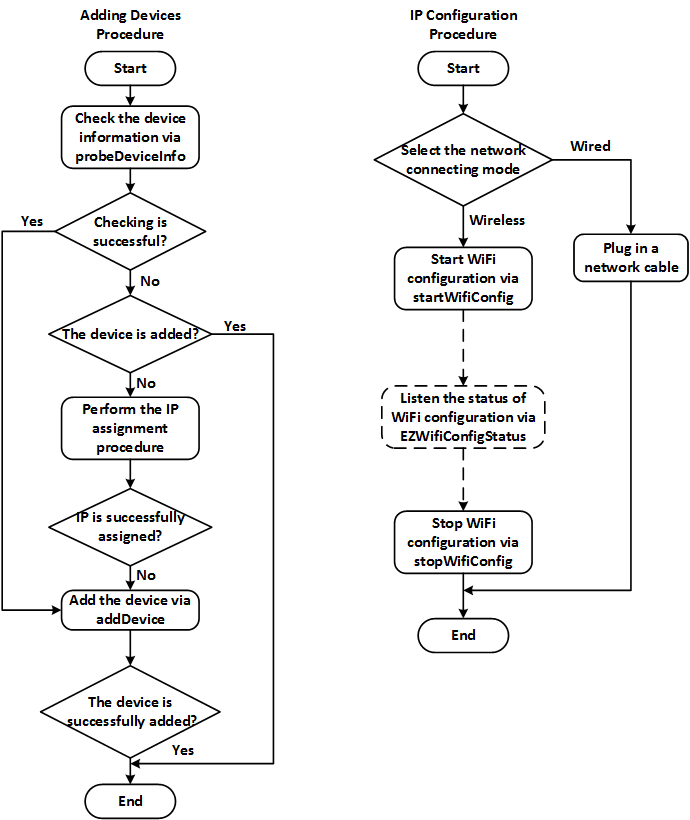
- The object after searching the device information (API is probeDeviceInfo) is EZProbeDeviceInfo. If it returns device information object, it indicates searching succeeded. You can add the device.
    try {
          EZProbeDeviceInfo mEZProbeDeviceInfo = EZGlobalSDK.getInstance().probeDeviceInfo(String deviceSerial);
            //Searching completed. Call the API to add device


        } catch (BaseException e) {
              e.printStackTrace();

              //Searching failed.
              int code = e.getErrorCode();
              //Code Value
              120020 Device is online and is added by the current account (with prompt)

              120022 Device is online and is added by other account (with prompt).

              120023 Device is offline and is not added by any accounts (call API for Wi-Fi settings)

              120002 Device does not exist and is not added by any accounts (call API for Wi-Fi settings)

              120024 Device is offline and is added by other account (with prompt).

              120029  Device is offline and is added by the current account (with prompt).

              Other (with prompt)
        }
- Searching completed. Add the device.
          // Searching completed. Add the device.
          //deviceSerial: Device serial No.;
          //mVerifyCode Device verification code which is on the device label and contains 6 uppercase letters.
      try {
            boolean ret = EZGlobalSDK.getInstance().addDevice(String deviceSerial, String mVerifyCode);
            if (ret) {
              //Added.
            }
          } catch(BaseException e) {
            e.printStackTrace();
          }
- Call API for Wi-Fi settings. The startConfigWifi should be used with stopConfigWifi. After starting Wi-Fi configuration, you can define a timer to call stopConfigWiFi to stop the configuration. If you want to use sound wave to set Wi-Fi, the device should also support this function. This API supports batch configuration. Set deviceSerial as “null” to realize batch configuration.
/**
 * Start Wi-Fi Settings
 * @param context  Apply activity context
 * @param deviceSerial   Configure device serial No.
 * @param ssid  Wi-Fi SSID
 * @param password  Wi-Fi password
 * @param back     Configure Callback
 */
  EZGlobalSDK.getInstance().startConfigWifi(Context context,String deviceSerial, String ssid, String password, EZOpenSDKListener.EZStartConfigWifiCallback back);

  /**
   * Start Wi-Fi Settings
   * @since 4.8.3
   * @param context  Apply activity context
   * @param deviceSerial   Configure device serial No.
   * @param ssid  Wi-Fi SSID
   * @param password  Wi-Fi password
   * @param mode  Configuration mode. Combine the modes listed in EZWiFiConfigMode (EZWiFiConfigMode.EZWiFiConfigSmart-Normal Mode. EZWiFiConfigMode.EZWiFiConfigWave-Sound Wave Mode). E.g., EZWiFiConfigMode.EZWiFiConfigSmart|EZWiFiConfigMode.EZWiFiConfigWave
   * @param back     Configure Callback
   */
  EZGlobalSDK.getInstance().startConfigWifi(Context context,String deviceSerial, String ssid, String password, int mode,EZOpenSDKListener.EZStartConfigWifiCallback back);

  /**
   * Stop Wi-Fi Settings
   */
  EZGlobalSDK.getInstance().stopConfigWiFi();


  /**
   * Configure Callback
   */
  EZOpenSDKListener.EZStartConfigWifiCallback mEZStartConfigWifiCallback =
        new EZOpenSDKListener.EZStartConfigWifiCallback() {
            @Override
            public void onStartConfigWifiCallback(String deviceSerial,final EZConstants.EZWifiConfigStatus status) {
                AutoWifiConnectingActivity.this.runOnUiThread(new Runnable() {
                    @Override
                    public void run() {
                      if (status == EZConstants.EZWifiConfigStatus.DEVICE_WIFI_CONNECTED) {
                            // Device connected to Wi-Fi.

                        } else if (status == EZConstants.EZWifiConfigStatus.DEVICE_PLATFORM_REGISTED) {
                            // Device registered to the platform. Call the adding device API to add it.

                        }
                    }
                });
            }
        };
Note: During the process of deleting device from the account, configuring the Wi-Fi, and then adding the device, please wait for two minutes after resetting the device and then call the APIs for Wi-Fi configuration, which can increase the success rate (as the platform can get the device offline status in two minutes after resetting the device. If the platform gets the device offline status, the Wi-Fi configuration success rate will be high.)
Note 1: The status reported by DEVICE_WIFI_CONNECTED and DEVICE_PLATFORM_REGISTED may be lost. If lost, search the device status by calling probeDeviceInfo and perform further operations according to the device status.
Note 2: For Hikvision device, you may need to activate it before adding it. Search the device in LAN and check if the device is activated (activation is not required for EZVIZ device). If it is inactive, call the API to activate it.
//sadp Search Device in LAN
EZHCNetDeviceSDK.getInstance().startLocalSearch(new EZHCNetDeviceSDK.SadpDeviceFoundListener() {
            @Override
            public void onDeviceFound(final EZSADPDeviceInfo sadp_device_info) {
                LogUtil.d(TAG,
                    "onDeviceFound  " + sadp_device_info.getDeviceSerial() + "  " + sadp_device_info.getDeviceSerial());
                    //Find the device.
                    //Check if the device is activated.
                  boolean isActivied =  sadp_device_info.isActived();

            }
        });

//sadp Disable Searching Device in LAN
EZHCNetDeviceSDK.getInstance().stopLocalSearch();

//sadp Activate Device in LAN
new Thread(new Runnable() {
            @Override
            public void run() {
                final int result = EZHCNetDeviceSDK.getInstance().activeDeviceWithSerial(deviceSerial, mPassword);
                if (result == 1) {
                    // TODO: 2017/8/15 Activation successful
                    return;
                }else {
                    //TODO: 2017/8/15 Activation failed
                    runOnUiThread(new Runnable() {
                        @Override
                        public void run() {
                            if(result == 2020){
                                // TODO: 2017/8/16 Weak password.

                            }else{
                                // TODO: 2017/8/16 Activating failed.

                            }
                        }
                    });
                }
            }
        }).start();